How to Perform Live With Ableton Live (The Ultimate Guide)
Ableton Live prides itself on being a digital audio workstation (DAW) designed for performing live. But setting up your live performance with Ableton can be baffling.
Fortunately, Ableton Live’s features allow you to create virtually any type of live setup, from a simple DJ template to a complex full-band performance with backing tracks, follow actions, MIDI integration, and live looping. There are no limits to what you can do with Ableton Live, but coming up with a full-functioning, dynamic live set can be daunting to newcomers.
In a nutshell, these are some of the main guidelines that may help you to come up with a fully-functioning Ableton project for a live performance:
- Make sure you identify what kind of musician you are and what you’re ready or able to do while on stage.
- Unless you’re an instrumentalist, make sure your entire live set is divided into handy .wav stems or full-blown backing tracks.
- Use Scenes and Follow-Actions efficiently in the Ableton Live session view.
- Find something to do while on stage, even if it’s just tweaking some knobs. Just laying there doesn’t cut it if you’re trying to come up with a dynamic live show.
- Make sure you have a MIDI controller that’s suited to your abilities. Don’t try to push your technical prowess: it’s better to deliver a good show than to fail at trying to be a MIDI virtuoso.
- Be very aware of CPU usage—CPU overload can ruin your live show with nasty crashes and clicks.
- Make sure your project is set up in a way that allows you to present your music to an audience, feel comfortable while on stage, and have some fun in the meantime!
- Have backups ready in case something goes wrong.
- (Optional) Use Max4Live devices to customize your set even further.
Contents
Start by Deciding on Your Approach (3 Options)
The first step to creating your live set is to decide on your approach. Every set is unique on its own, but I have identified three broad categories of Ableton Live musicians:
- The DJ
- The electronic musician
- The instrumentalist
Needless to say, each one of these comes with different requirements.
The DJ
Ableton Live was not specifically made for DJing. But if you’re a DJ who knows his way around the DAW, performing live with Ableton instead of Traktor, Serato, or Virtual DJ can be gratifying.
Ableton Live allows for more precise control of your tracks and bounces and comes with a wider array of performative audio effects. You can easily set up a live set for DJing by using one of Ableton Live’s DJ templates. But as a professional musician, you should know how to come up with a personalized DJ template.
The first thing you want to do to build your live set is to highlight the Crossfader section. You can do so by pressing the [x] in the right corner of the screen, right below the Send and Return hide/show buttons. This will reveal the master Crossfader and the Crossfade Assigns, which can be found in every audio track in your live set project.
You should then assign your first audio track to Crossfade A and your second audio track to Crossfade B. Don’t forget to map the master Crossfader to the respective knob on your DJ controller or MIDI instrument. This way, you can effortlessly switch between track A and track B, just like you would with Traktor or Serato.
Drag your tracks to their respective audio channels and use the launch buttons to play either individual tracks or full scenes. You’re not limited to just two A/B audio tracks, so you can creatively combine different bounces within one single output channel.
Finally, explore the various audio effects you can find in Ableton Live to provide your DJ live set with a more dynamic feel. There are customized audio effects specifically designed for DJing but, once again, you can build personalized effect templates to have more control over your performance. Effects such as EQ and Reverb work wonders, but more creative stock plugins like Beat Repeat and Echo are also perfect for live DJing.
The Electronic Musician
This is the most common type of Ableton Live set. You’re an electronic musician who’s come up with some top-quality tracks, but you have no idea of how to make them work on a live performance. There are many ways of building a fully-functioning live set for your productions, but you should always start by bouncing your tracks.
Most Ableton Live sets will be based around backing tracks. There’s no shame in it: unless you can finger-drum like AarabMuzik, you’ll need to have some .wav files running to deliver a convincing live performance. But before slicing your entire live set into stem tracks, make sure you decide on your approach.
One of the biggest challenges of performing electronic productions live is to know how to keep busy while on stage. This relates closely to how you should bounce your tracks, and also depends on the equipment you’re using. If your live performance is based on a MIDI controller such as Novation’s Launchpad, you’ll want to have as many stems as possible. If you’re using something like Native Instruments’ Maschine, your priority should be to come up with a few Drum Racks, mappable audio effects, and impactful on/off toggles.
Most electronic musicians perform live using a combination of launchable backing tracks/stems, audio-effect automation, and minor MIDI applications, such as a playable softsynth and Drum Racks. Each Ableton Live set is unique, so make sure you identify your flaws and qualities as a performative musician before working on your live set.
The Instrumentalist
Ableton Live is not just for DJs and electronic musicians. Guitarists, pianists, and drummers also find it incredibly useful. If you’re an instrumentalist, you’ll probably not need backing tracks on your live set, and you’ll want to spend as little time as possible looking at your computer’s screen.
A basic sound card should be enough for you to use your instrument with Ableton Live. This will allow you to quickly process it with audio effects that can be mapped to a MIDI instrument or changed automatically.
You can also use Ableton Live to power your MIDI controller. Over the years, I have encountered many keyboard players who have decided to snub their old pianos for a much lighter and versatile MIDI keyboard. They use Ableton Live to launch timbers of everything from top-quality piano emulations to crazy sound effects.
Scenes and Follow Actions
Once you’ve realized what type of Ableton Live musician you are, it’s time for you to start working on your live set. In the next paragraphs, I’m going to provide you with all the information you need to build the perfect live set. But first, you need to understand the DAW’s basics.
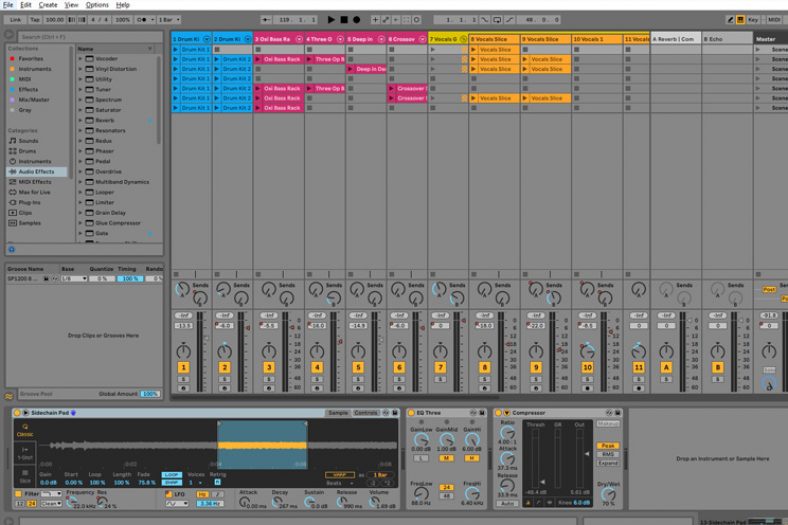
Creating Scenes in the Session View
To perform on stage, you should use Ableton Live’s session view. The session view is divided by scenes, which can be spotted on the right side of the screen (under the Master track). These scenes can be activated according to your song’s tempo, simultaneously playing all the correspondent tracks. If you have three audio clips in scene 1, all of them will be activated once you launch scene 1. It’s simple, right?
Ableton Live opens up with 8 ready-to-use scenes, but you can create as many as you’d like by pressing Ctrl+I or selecting ‘Insert Scene.’ The scenes will be automatically linked to your project’s tempo and meter, but you can change both on the go.
To change the BPM of a scene, all you have to do is rename the scene. Imagine you’re trying to go from song 1 (running at 120 BPM) to song 2 (a 135 BPM banger). To keep the original tempo of both songs, press Ctrl+R to rename scene 1 and type “120 BPM” and do the same to scene 2, typing “135 BPM.” Immediately, you’ll notice that the ‘play’ icon in both scenes changed color. This means that, once scenes 1 and 2 are activated, your project’s tempo will change to the respective BPM.
You can also change meters by using the very same approach: just write “3/4” in the scene’s name, and you’ll be good to go! To combine both features, just write “135 BPM 3/4.”
Follow Actions for Automating Scenes
You only have two hands. That’s why it’s so important to make the most of Ableton Live’s follow actions. While all scenes can be manually controlled and MIDI-mapped, it’s sometimes better to let your computer do the heavy lifting, so you can focus on playing your MIDI keyboard or live drums.
Alex Banks explains this very nicely in his Ableton live performance masterclass here:
Explaining all the possible things you can do with Ableton Live’s Launch Mode would make for an article of its own. But once you get a hold of it, it’s pretty easy to understand how it works.
You can access Launch Mode by opening one of the clips in your live set and selecting the [L] button on the bottom left side of the screen. This will show the Launch Mode options, which include four types of triggers and the follow-action menu.
The follow-action menu allows you to set up automatic clip changes that can be defined with precision or left to chance. You have to select the clip’s length (i.e., the time it will take between the clip’s playback and the designated follow action) and choose one of eight actions.
The available follow actions are Stop (in which the clip stops), Play Again (in which the clip repeats itself), Previous and Next (in which the previous/next clip in the track is activated), First and Last (in which the first/last clip in the track is activated), Any (in which a random clip in the track is activated) and Other (in which a random clip in the track other than the clip that just played is activated).
Ableton Live’s follow actions can be very useful for creating minor time-saving automation in your live set. But once they’re taken to the extreme, they have almost limitless power—that’s why Ableton Live’s Launch Mode is often used for programming complex live-theater soundtracks and radically-randomized electronic music performances.
MIDI Controllers
While some electronic musicians dare to use nothing but their laptops on stage, most Ableton Live performances will feel utterly boring without a MIDI controller for Ableton Live. If you want to create a dynamic live set, make sure you have one or two MIDI controllers with you.
There are many types of MIDI controllers, and none is fundamentally better than the other. Sure, Ableton’s Push 2 is probably the best-integrated Ableton Live MIDI controller, but you can come up with live performances as immersive using any other piece of equipment.

Crucially, you need to ask yourself: what am I good at? If you’re a savvy keyboard player, it’s probably a nice idea to have a MIDI keyboard on stage. If you have flawless rhythm, an MPC-style controller is the best choice. And if you’re more of a passive musician, you should go for a MIDI controller with lots of knobs, so you can change as many audio-effect parameters as possible.
I’m a big fan of MIDI controllers such as Native Instruments’ Maschine. The drum pad is great, but the real reason I find it useful is because of its many mappable buttons. I use these buttons to activate different audio effects in my live set and further control them using one of Maschine’s eight knobs. This way, I can choose to affect clips only when I want to and completely change the sound of my backing tracks.
This is just an example of how a MIDI controller can inspire you to come up with new solutions for your live set. In my experience, the more mappable functionalities, the better.
In Ableton Live, the MIDI controller is the only pathway between your physical body and whatever’s happening in your DAW, and that’s why it’s so important to choose it wisely.
Struggling to Perform Live? Use MIDI Effects to Your Advantage
While acoustic musicians spend most of their time practicing, electronic producers tend to devote most of their day to creating tracks. For this reason, electronic musicians often struggle with the performative aspect of playing live.
If you find yourself missing the tempo while playing live drums or hitting the occasional wrong note on your MIDI keyboard, Ableton Live’s MIDI effects may come in handy.
The Arpeggiator effect is great for ensuring that your drums always land on the beat. I usually insert an Arpeggiator before Drum Racks at a rapid tempo (something between 1/16 and 1/32) so my beats always have a quantized feel, even if I’m playing them live.
On the keyboard, using the Scale effect is a practical way of ensuring that your mistake goes unnoticed, even if you hit a wrong note. The Scale effect maps every key in your keyboard to a designated musical scale, hence ensuring that you never embarrass yourself by hitting the wrong note during a live performance.
Live Looping
Ableton Live’s session view is designed to support live looping. By default, your audio/MIDI clips and scenes will loop indefinitely once you activate them. In addition, you can combine track stems from other scenes with your current loop.
Imagine that you start your live show with a 127-BPM track and that you end the set with a song running at the same tempo. You can easily use the drum stem from your first track in the last, and vice-versa.
This is one of the reasons why Ableton Live is so much fun for EDM musicians: in genres that tend to stick to just one tempo (such as minimal techno or drum and bass), you can virtually combine every stem from every song in your live set in numerous creative ways, generating new-sounding tracks on the spot.
Ableton Live offers a second solution for live looping that’s not based on the session view’s grid. Perfect for instrumentalists, Looper is a special audio effect that works just like a real guitar pedal looper. Looper can be easily locked into your live set’s tempo and is perfect for generating immersive sounds and dense soundscapes.
Create More Than One Live Set
Once your live set is good to go, you may want to create slightly different versions of it. I’m not just talking about shorter live sets for showcases or more downtempo-y sets for quieter gigs. I’m talking about preparing for every possible outcome you can think of.
If you play live with a band, make sure you record everyone else’s instruments, so you can play live even if one of your bandmates is missing. The same applies if you’re a solo performer who’s sometimes accompanied by another musician: make sure you have one set ready to go for playing with or without a band.
Watch Your CPU – Don’t Overload the Set
This is when things start to get tricky. When I first started performing live with Ableton, I was forced to make the most out of a humble Windows PC with just 8 GB of RAM. Naturally, my live set needed to be extremely light to properly work. This was many years ago, and I have since updated my computer. However, the CPU-saving tricks that I employed in those early days have stuck to me and are still a part of my live sets.
One of the things that make building a live set hard is to know that there are certain limits to the number of plugins and audio files one should use. If you divide your tracks into tenths of stems each, you’ll most likely deal with performance issues. This is even more noticeable if you decide to stack numerous CPU-heavy external VSTs in your live set.
My first advice to producers working with a limited machine and trying to come up with a reliable live set is this: identify a maximum of three external VSTs that you need to have in your set, and stick with Ableton’s stock plugins for the rest. Ableton’s stock plugins are very powerful if used correctly, and they’re very low on CPU usage. On the other hand, fan-favorite VSTs such as Omnisphere and Kontakt can “kill” your CPU even if used with moderation.
To keep your CPU usage under control, make sure you’re using audio files whenever you can. MIDI files should only be used for playable instruments; if you want to perform a sick Operator lick with your MIDI keyboard while on stage, make sure to include a MIDI track with your Operator patch. But don’t use MIDI tracks that are just sitting there—these must be replaced by audio tracks.
In Ableton Live, you can easily replace a MIDI track with an audio file by resampling it or hitting ‘Freeze Track,’ followed by ‘Flatten.’
One additional CPU-saving tip that’s surprisingly useful is to delete all unused Stop buttons. In the live session view, the boxes where your clips go already come with a Stop button. You can erase unnecessary Stop buttons by pressing Ctrl+E. It seems trivial, but it’s a very effective way of saving CPU usage without sacrificing any crucial element of your live set.
Have a Backup!
The “evangelists” of analog equipment often boast about the fact that computers tend to fail at the worst possible moment. While there’s some truth to it, this shouldn’t prevent you from using a Mac or PC on your live performance.
A good way of making sure that you’re prepared for any possible errors is by setting up a backup. Macs tend to be more trustworthy, but they too are susceptible to bugs and crashes. Having a plan B is always a good idea, whether it’s a second computer with your live set already loaded or a simple audio track connected to the venue’s mixer.
Using Max4Live to Customize Your Live Set Even Further
Remember when I told you that Ableton Live’s stock plugins are both light on CPU and extremely powerful? Well, the same applies to most max4live devices, which can help to take your live sets to the next level.
There are thousands of Max4Live tools available on the web, and many were specifically designed for live performances. Websites such as Ableton Drummer offer a complete catalog of free Max devices for Ableton Live.
Their Note to Map Collection, for instance, allows you to more safely control your MIDI mappings by accessing a MIDI matrix and setting up MIDI remote buttons.
Some Max4Live MIDI effects such as Note to Chord work as an extension of Ableton Live’s built-in MIDI effects, and let you play chords with greater precision.
Tips When Building a Live Set for Ableton Live
After years of performing Live with Ableton, I have encountered a series of useful tips and tricks that have guided the way I develop Ableton projects for the stage. These shouldn’t define the way you build your live set, but they can sure come in handy.
Always keep track of your files
My live sets rely heavily on bounced tracks, and the last thing I want is for one of them to go missing. For this reason, I always make sure that the .wav tracks I use in my live set are placed in the correct folder. If left to chance, Ableton’s template folders can be confusing, and that’s not what you want when you’re about to perform in front of an audience!
Define Min/Max Values For Your MIDI Mappings
While performing live, you’re sometimes carried away with the adrenaline and excitement and end up pushing a knob a bit too far… To avoid this, I always set up the minimum and maximum values for my MIDI mappings.
You can do so in MIDI mode. Watch how the window on the left side of the screen shows your MIDI mappings and includes two boxes tagged as ‘Min’ and ‘Max.’ These allow you to define thresholds for your knobs.
You can even invert the minimum and maximum values, hence selecting which way you want your knob to go. This means that, for instance, you can increase the Dry/Wet value of a certain effect by twisting the knob to the left if that’s what makes you comfortable.
Make the most of Key Maps
While most mappings in Ableton Live are MIDI-based, the software also lets you map many features to a key on your computer. To do so, just press the ‘Key’ button in the left top corner of the screen, select an option, and press the respective key.
Key Maps are great for complementing MIDI controllers and allow for some extra liberty while playing live. But they’re also perfect for mapping very sensitive controls that you don’t want to trigger accidentally! Allow me to explain…
In one of my live sets, I used a full-song backing track that wasn’t entirely connected to the project’s tempo, as it didn’t commit to any particular BPM (the tempo varied from section to section). If I mapped this track to a button in my MIDI controller, I’d be taking the risk of accidentally pressing such a button and causing the track to restart. This would be disastrous. My solution was to map the track to a key in my computer’s keyboard (namely, the key ‘1’) to protect myself from committing a gross mistake while on stage.
Don’t Forget About Your Master Track
There are so many things to do while building a live set that you can sometimes forget about your master track. But in a live performance, your master channel is essential. I always use a Limiter on my master to make sure there’s no clipping throughout the show; a minimum of compression is recommended as well.
Summary
Like every live show, every Ableton live set makes for a heck of a ride! Making sure your live set is working 100% right is a trial-and-error process, so don’t feel desperate if things aren’t quite working out at the beginning.