What Is The “Travis Picking” Pattern? (And How to Learn It)
The Travis Picking pattern, or the alternating-thumb style, is a popular fingerpicking technique named after the American country guitarist Merle Travis. The core of the technique is the thumb switching between two different bass notes while the other fingers play the melody on higher strings.
Although Merle Travis was a country singer and guitarist, “Travis Picking” is used in many different genres. You can hear “Travis Picking” in many folk, blues, country, and rock songs. Bob Dylan, Fleetwood Mac, Led Zeppelin, and Johnny Cash are some of the names who regularly use the technique in their compositions.
Contents
What Is The “Travis Picking” Technique?
“Travis Picking” is the technique where the thumb plucks a steady beat with the bass notes on the lower three strings while the index, middle, and ring fingers play the melody on the higher three strings with a syncopated rhythm.
“Travis Picking” is always in the 4/4 time signature, as the thumb switches between two bass notes with a steady beat. It is essentially a simple style to play, but with complex melodies, it can get quite challenging. It requires your thumb to move independently from the rest of the fingers, playing the melody on the higher strings.
Playing with this pattern is quite amazing, as it sounds like two guitars playing at the same time as the melody and bass lines are played together.
How To Learn The “Travis Picking” Pattern?
Learning the “Travis Picking” pattern is a great way to start playing with the fingerpicking technique, as it gives you the fundamental idea before moving on with complex patterns. To learn it, you have to train your thumb to move steadily between the lower three strings.
Many people struggle with the “Travis Picking” technique as they try to play songs or riffs without practicing the fundamental patterns. In order to build solid ground with this technique, you have to start from the beginning and progress from there, building muscle memory for the thumb movements.
Starting slowly from scratch and with the right technique is highly important, as wrong techniques are harder to fix later when they are already in the muscle memory. One of the most important things with any kind of fingerpicking technique is picking hand and finger positions. Try to maintain your picking hand in a thumbs-up position, which means try to have an almost 90-degree angle between your thumb and index finger. This way, you can avoid your thumb and other finger bumping into each other when playing fast patterns.
Another important thing to be aware of is to use the right fingers all the time. The thumb is always responsible for the lower 3 strings, and often the index and middle finger share the higher three strings. If all three higher strings are used, then the ring finger also comes to play the highest string.
To learn the pattern well, you have to start simple. First, try to alternate bass notes with your thumb without adding any other finger movement. Then you can add another finger, the index finger, for example, to play a single note in between the bass notes. Later, you can go on with a three-finger pattern, adding the middle finger into the equation. And finally, you can move on to more complex melodies and picking patterns.
“Travis Picking” Pattern Exercises
Alternating Thumb Practice
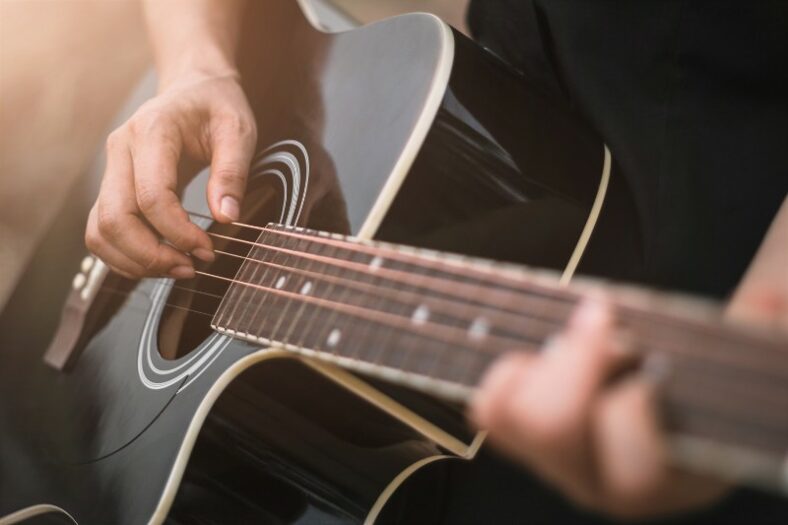
The first exercise is for getting the thumb movement right. So, pick a chord, let’s say an E minor chord, and use your thumb to play a steady beat, switching between the low E and A strings. Once you feel comfortable, try to do the same exercise, switching between E and D strings.
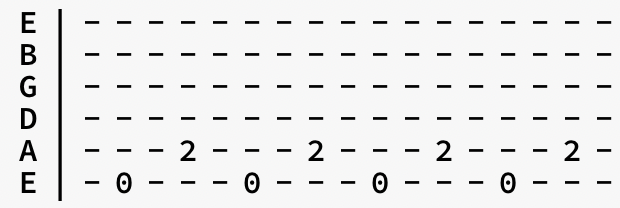
Until now, it should be pretty easy, even for an absolute beginner. The next step is to use the thumb to keep a steady beat again. But, this time, the pattern goes as E-A-E-D strings.
These three exercises are the core of the “Travis Picking” pattern. You can choose any chord and try to apply the same pattern to it. Another good exercise is to have a chord progression with a few chords and use the pattern for a chord sequence.

Two-Finger Patterns
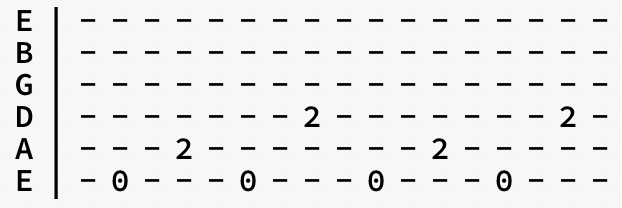
Without a melody in higher strings, the “Travis Picking” pattern is not complete. So, the two-finger pattern is the simplest form of “Travis Picking.” This time, we play a C major chord, and while our thumb switches between A and D strings, our middle finger will pluck the B string after every bass note.
So, the pattern goes as A-B-D-B strings. Try to start slow and build up the speed later. Also, be careful with your picking hand’s position. Try to maintain a large angle between the index finger and the thumb.
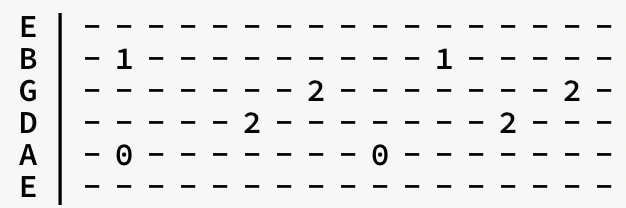
After you feel comfortable with the pattern, you can add another chord to the equation. For example, add a G major chord and try to make the transition between the two chords while keeping the pattern. When you switch to the G major chord, the pattern will be E-B-D-B. Try to play the sequence repeatedly to get the hang of it. You can also experiment with different chords.

Three-Finger Patterns
In the next step, we add the third finger to the pattern. So, while your thumb plays the bass, index, and middle fingers, the ring finger will occasionally play the higher notes. First, we choose a single chord and play it repeatedly to familiarize our fingers with the pattern.
So, we go with an A minor chord. The B string is always played by the middle finger, while the index finger plucks the G string. The thumb goes steady between the A and D strings. Here, having a wide angle between the thumb and the other fingers is important as the index and thumb can crash with each other, making you lose the rhythm and get distracted.
Try to play the same pattern with different chords to get used to it. Later, you can add those chords to the transition to play a whole chord sequence. In this case, we play a G major chord. Here, you can use the ring or middle finger to play the high E string.

Try to create and play different chord sequences with these patterns. For example, in this exercise, there are C, C/G, and A chords. The highlighted part shows the transition to the A chord. The finger pattern stays the same throughout the sequence. Start slowly and play with a metronome to keep the beat steady.

Hints And Tips
The most important tip for the “Travis Picking” pattern is to start slow and have a good technique before building up the speed. Start slow, and play with a metronome to keep the beat steady. You can start with 50 BPM and increase it as long as you feel good with your technique.
When starting to play fast, avoid plucking the strings too hard. Always try to be smooth and light with your picking technique. Plucking too hard will make you lose the rhythm and sound less professional.
When you feel comfortable with playing patterns and the thumb movement, as well as the melodies on the higher strings, you can start adding embellishments to your patterns, such as hammer-ons, pull-offs, and slides. However, these are advanced techniques, so be sure to have proficiency with patterns before moving on to embellishments.
When you are trying to learn a new song with the “Travis Picking” pattern, try to divide it into sequences and learn it part by part. Try to find the repetitive patterns in the riff and learn them to get the feeling of the song.
Conclusion
The “Travis Picking” pattern is a great fingerpicking technique for beginners as well as experienced guitarists to explore and enjoy. Playing the bass lines as well as the melody together makes you sound like a small band and helps you significantly with your playing technique.